In this article, I walk you through how to organize Moderated Usability Testing, covering key steps like setting goals, creating tasks, and recruiting participants through Prolific.
Whether you’re new to usability testing or looking to refine your approach, I hope you find it practical and helpful for your projects.
Check it out, and let me know your thoughts!
Let’s clarify the basic meanings.
All usability tests can be divided into two large groups:
Qualitative usability testing— focuses on collecting insights. (It can be useful to research how users interact with a specific flow.)
Quantitative usability testing — focuses on collecting metrics that describe the user experience. (It can be useful to research which landing design works better, or measure how many users understand a specific feature, etc.)
These two types of usability tests can be:
Moderated — when the researcher and participant have live interaction. This can be a video meeting or an in-person meeting. It is good for learning behavior. If you’re unsure how users will react to your design, a moderator can observe closely and ask clarifying questions as users interact with it.
Unmoderated — when the researcher sets up the test, and the participant conducts it remotely. The result is only response numbers; for instance, 20 users choose version one of the design. This type of test is good for a large audience and costs less than moderated tests.
Both tests can be conducted through the Prolific platform. But, in this article, I’m sharing instructions for the moderated usability test.
Let’s get started!
1. Instructions on How to Prepare
1.1 Set Goals for Your Research
It is essential to clearly define the goals of your study, as they form the foundation for all subsequent steps.
In my interviews, I usually go beyond testing the user interface. I also explore participants’ experiences and expectations. For this reason, I often establish separate goals for evaluating the interface and understanding their broader experiences in a particular domain.
For example:
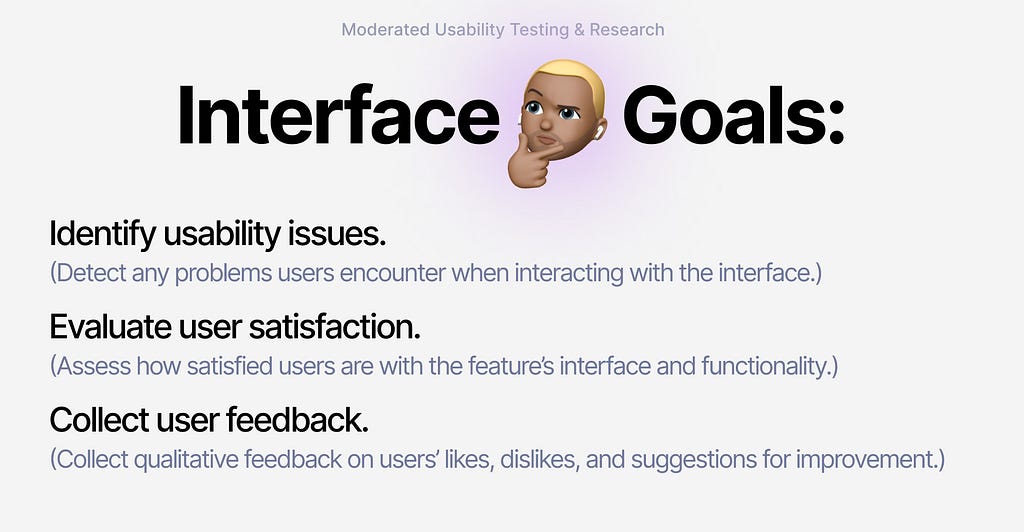
Interface Goals:
– Identify usability issues. (Detect any problems users encounter when interacting with the interface.)
– Evaluate user satisfaction. (Assess how satisfied users are with the feature’s interface and functionality.)
– Collect user feedback. (Collect qualitative feedback on users’ likes, dislikes, and suggestions for improvement.)
General Experience Goals:
– Understand how a specific group typically approaches a task (e.g., “How do students usually write their papers?”)
1.2 Formulate Specific Tasks and Define Flows to Test
Create specific tasks for participants to complete using your prototype. These tasks should simulate realistic scenarios to help you assess how users interact with the interface.
Example:
- Scenario: You are a student who needs to write a short assignment but want to finish quickly.
- Task: Create a new document, use the AI assistant to generate content, and finalize the assignment. (It can be more detailed)
Once you’ve defined the tasks, plan the flow you want to test. Map out all the steps the user will need to take to successfully complete the task. Remember, you don’t need to design every possible state for all clickable elements — just the key states required to complete the task.
For example, if the user clicks on an incorrect item, this action will already reveal that they are searching in the wrong place.
Pro Tips:
Secure Prototypes: Create your prototype in a separate file before sharing it with external users. This ensures the security of your main project files.
Optimize Settings: Choose the correct scaling settings when generating a shareable link (e.g., in Figma). Improper settings can negatively impact the user’s experience by making elements appear misaligned or difficult to interact with.
Enhance Guidance: Add subtle interactive elements like hover states and tooltips to provide non-intrusive guidance during the test.
Persistent Task Reference: Include an element in the interface (e.g., a fixed button or icon) that remains visible throughout the session. When hovered over, it should display the current task to help participants easily recall their instructions without disrupting the flow.
1.3 Write a script
Plan your dialogue and interactions with participants. Create a detailed scenario outlining your speech and the questions you will ask them. A structured script ensures consistency and makes the research process smoother.
I usually divide the script into four parts:
Welcome Part:
- Introduce yourself and the purpose of the research.
- Explain what participants can expect during the session.
- Reassure them that there are no right or wrong answers and that their feedback is valuable.
- Obtain their consent to participate and record the session, if applicable.
Pre-Test Questions:
- Gather background information about the participant (e.g., “Have you used similar tools before?” or “What’s your typical process for completing this type of task?”).
- Understand their initial expectations or assumptions about the prototype.
During-Use Questions:
- Ask participants to think aloud while interacting with the prototype.
- Probe with open-ended questions like: “What are you looking for here?”, “Is this what you expected?”, “What do you think this button/feature will do?”
Post-Test Questions:
- Reflect on their overall experience (e.g., “What worked well for you?” or “What felt confusing or frustrating?”).
- Ask for any additional feedback or suggestions for improvement.
Pro Tip:
Stick to this plan for each participant. Consistency in your approach will make it easier to analyze and compare the data collected during your research.
2. How to recruit participants through Prolific:
To simplify the process, refer to the accompanying scheme (image provided). Follow these steps to set up your study on Prolific:
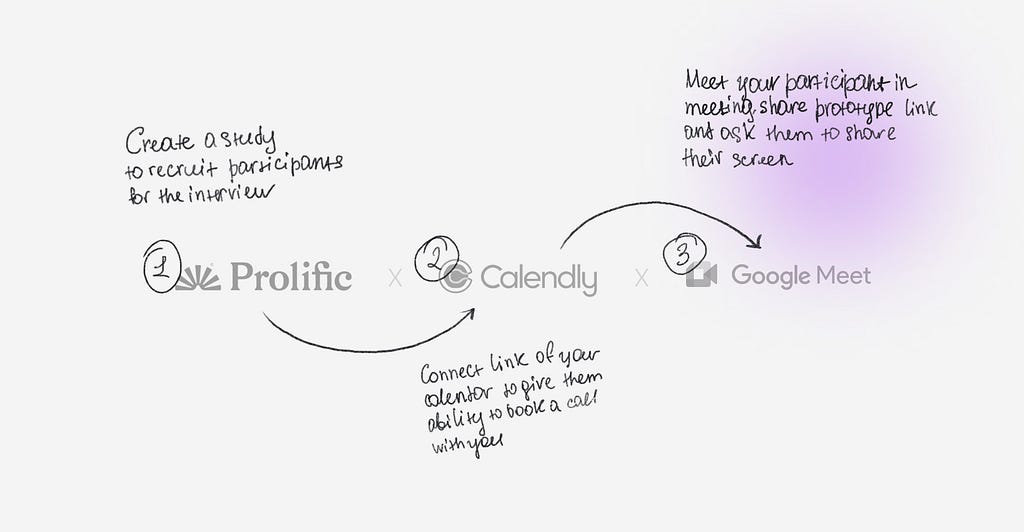
So the scheme of the research is to find participants through Prolific, let them book a call with you through Calendly, and during the meeting, you will share the prototype link.
Pro tip how to fill — Study Description
Use a clear and engaging description to explain your study. Here’s a sample:
“Participate in our AI-powered writing tool’s usability testing. While testing the design prototype, we aim to learn the following:
-Your experience writing the assignment.
-Any problems you encounter while using the tool.
-Your level of satisfaction with the tool’s interface and functionality.
-How quickly and accurately you were able to complete the task.
-The study will take place via a video session, where you’ll complete specific tasks -using the prototype and share your thoughts out loud as you work.
To participate, you’ll need to:
–Have your Prolific ID and Prolific email address ready for scheduling.
-Use the provided link to schedule your Google Meet session via Calendly. (Once scheduled, you will receive a completion link for Prolific.)
-Attend the video session at the scheduled date and time (link sent via Prolific’s internal messaging system).
During the session, you’ll:
–Ensure a stable internet connection.
-Turn on your camera and microphone.
-Open the Figma prototype link.
-Share your screen.
-Think aloud and share your feedback as you work.*
Payment Details:
Participants will be paid within 1–3 business days after completing the session. Payments will be processed using Prolific’s standard methods upon submission approval.
Conditions for approval include:
-A full video and audio recording of the session.
-Attendance at the scheduled interview.
-Using a desktop PC (mobile phones are not allowed).
Personal data will not be stored. Video and audio recordings will be used strictly for internal quality analysis.
Pro tip how to fill — Data Collection Section
In this section, provide the link for participants to schedule their sessions. Use a scheduling tool like Calendly.
- Instructions for Calendly:
Include your Calendly link so participants can book their interview slots. Instructions for setting up Calendly will be covered in the next section of the outline.
Pro tip how to fill — Completion Paths Section
Select the Manual Review option for completion paths. This allows you to review each session and manually approve payment. This approach is recommended because not all interviews may meet your quality criteria.
Pro tip how to fill — Participant Demographics
Define your focus group based on the goals of your study. Use filters for:
Age: Specify the age range of participants.
Country: Include or exclude countries based on your target audience.
Education Level: Ensure participants have the necessary background (e.g., students, professionals).
Other Criteria: Add relevant filters based on your research needs, such as specific occupations or experience levels.
The structure of the process:
Participants will see your study on Prolific and read the description. After clicking on the study link, they will be directed to Calendly, where they can choose a date and time to book a call. On the scheduled day, both of you will join a Google Meet (or another tool). You will meet your participant, share the Figma link, and ask them to share their screen. This is how the interview will begin.
3. How to Analyze All Data and Explain It to the Team
Analyzing usability testing data requires time and patience.
I’ve tried using transcription applications to convert video recordings into text, with the intention of summarizing the key points using GPT or similar tools. However, I just spent time trying to make this hack work, but unfortunately, I didn’t get what I had expected.
Instead, I usually do it the old-school way. I use a board in FigmaJam, dedicating one board to each participant. While I listen to the video recording, I take notes directly on the board. All boards follow the same structure and focus on the same set of questions, ensuring consistency across participants.

After filling out all the boards for each participant, identify patterns and themes. Look for recurring issues, questions, or frustrations across participants. It’s also important to separate feedback related to interface-specific problems from more general observations about user behavior or preferences. Once you’ve identified all common issues, prioritize them.
How to Demonstrate Findings to the Team
You don’t need to start by sharing every small detail. A better approach is to group all issues into larger categories and share them that way. Usually, I demonstrate three main key insights and highlight all major issues that were common in each category. The categories I typically use are:
- Facts about the experience (based on research questions)
- Facts about the interface
- Pains and constraints
The most important part of this work is proposing improvements.
Create 1–5 hypotheses based on key insights and prioritize them based on the potential impact they can deliver.
For each hypothesis, include the following:
1.Hypothesis
2. Reason (Add insights collected during the research)
3. Solution
4. Opportunity/Benefit for business
I hope this information was useful! 🙂
If you liked this article sharing it with friends is greatly appreciated!
You can also click 👏 below (as many times as you want!)
![]()
How to prepare Moderated Usability Testing & Research was originally published in UX Planet on Medium, where people are continuing the conversation by highlighting and responding to this story.